MAC Address Spoofing Guide
This guide provides instructions for spoofing MAC addresses on different network interface controllers (NICs).
System Requirements
- Windows 10/11
Quick Navigation
| Category | NIC | Speed | Difficulty | Method |
|---|---|---|---|---|
| System | Intel NICs | 1 GbE | Hard - requires DOS boot, BIOS changes; may fail on some chipsets | EEUPDATE via DOS boot USB |
| System/PCIe | Realtek NICs | 1-2.5 GbE | Medium - tools are trial-and-error; depends on chipset | eFuse Programmer |
| PCIe | Mellanox ConnectX-3 | 10 GbE | Easy spoof, harder sourcing - commands are simple but finding the right card takes research | WinMFT flint (firmware flash) |
| USB | Realtek USB NICs | 2.5 GbE | Easy - plug in, run tool, done | Realtek USB PG Tool |
| USB | ASIX AX88179 | 1 GbE | Easy - widely available, simple tool | ASIXFlash / Captain Mac Tool |
Intel NICs
Prerequisites
- Download required tools:
For Intel network cards, you can use the EEUPDATE utility through a DOS bootable USB.
Setup Steps
Create Bootable DOS USB:
- Download Rufus (https://rufus.ie)
- Insert your USB drive
- Select "MS-DOS" as the boot selection
- Create the bootable drive
Prepare Files:
- Copy EEUPDATE.exe to your bootable USB
- Create changemac.bat with the following content:
@echo Off
echo Update your current mac?
pause
echo Current MAC
Eeupdate.exe /NIC=1 /MAC_DUMP
echo Updating MAC
Eeupdate.exe /NIC=1 /mac=REPLACEMEWITHMAC
echo Updated MAC
Eeupdate.exe /NIC=1 /MAC_DUMP
echo If the above did not work type the following manually:
echo EEUPDATE /NIC=1 /mac=REPLACEMEWITHMAC
echo EEUPDATE /NIC=1 /MAC_DUMP
echo Last command will display the current MAC(if it worked, should display new one)
pause- Example MAC:
AA:BB:CC:DD:EE:11- Do not use this mac, it will brick your network...
- BIOS Setup:
- Enter BIOS (usually F2 or Delete key during startup)
- Disable Secure Boot
- Enable CSM (Compatibility Support Module) mode
- Save changes and restart
Running the Script
Boot from USB:
- Insert the USB drive
- Boot into DOS (may require selecting boot device during startup)
- At the DOS prompt (A:> or similar)
- Type the first few letters of "changemac" and press TAB
- In DOS, TAB will auto-complete the filename
- Press Enter to run the script
- Follow the prompts
Manual Commands (if script fails):
dosEEUPDATE /NIC=1 /mac=AABBCCDDEE11 EEUPDATE /NIC=1 /MAC_DUMPAfter Completion:
- Remove the USB drive
- Restart the system
- Boot back into Windows to verify the change
- Revert your secure boot and CMS settings.
Important Notes
- Replace
AABBCCDDEE11with your desired MAC address - Keep your original MAC address noted down
- The
/NIC=1parameter targets the first network adapter- If you have multiple make sure either to change both or disable the one you dont need/use.
EEUPDATE /LIST_NICwill list you the NIC's installed.
- Some systems may require specific versions of EEUPDATE
- Not all Intel NICs support MAC address modification
- Incorrect MAC address format can cause network issues
Realtek NICs
Prerequisites
- Download required tools(trial and error):
For Realtek network adapters, you can modify the MAC address using the Realtek eFuse Programmer toolkit.
Programming Steps
Modify MAC Address:
- Open
8168FEF.CFGfile - Edit the first line to set your desired MAC address:
NODEID = 00 E0 4C 88 00 18
;ENDID = 00 E0 4C 68 FF FF
- Open
Run the Programming Script:
Execute
WINPG64.BATA successful rewrite will show output similar to:
****************************************************************************
*       EEPROM/EFUSE/FLASH Windows Programming Utility for                 *
*    Realtek RTL8136/RTL8168/RTL8169/RTL8125 Family Ethernet Controller  *
*   Version : 2.69.0.3                                                    *
* Copyright (C) 2020 Realtek Semiconductor Corp.. All Rights Reserved.    *
****************************************************************************

PG EFuse is Successful!!!
NodeID = 00 E0 4C 88 00 18
EFuse Remain 61 Bytes!!!
Verify MAC Address Change:
- Open PowerShell
- Run
ipconfig /all - Look for your network adapter's Physical Address
- It should match your programmed MAC address
USB NICs
Realtek USB NICs (Update)
Status:
- Realtek-based USB NICs (e.g., RTL8153/RTL8156 series) can also be permanently spoofed.
- Use the Realtek USB PG Tool package; primary folder to use:
- “LATEST_PUB_WIN_USB_PGTOOL_v2.0.22_V2”
Tool Package:
- RealtekMAC USB.zip
- Older folders inside are retained only for experimentation; the above folder is the recommended one.
- RealtekMAC USB.zip
Tested Hardware:
- Recommended USB NIC:
- USB‑C 2.5GbE (Uniaccessories)
- Examples that DONT WORK at the moment because of missing .CFG settings or custom EFUSE:
- Recommended USB NIC:
Quick Programming Steps (Windows):
- Open the USB PG Tool from “LATEST_PUB_WIN_USB_PGTOOL_v2.0.22_V2”.
- Select your device and make sure mode is set to EFUSE.
- Click “DUMP” to read current settings and confirm the tool returns “PASS”.
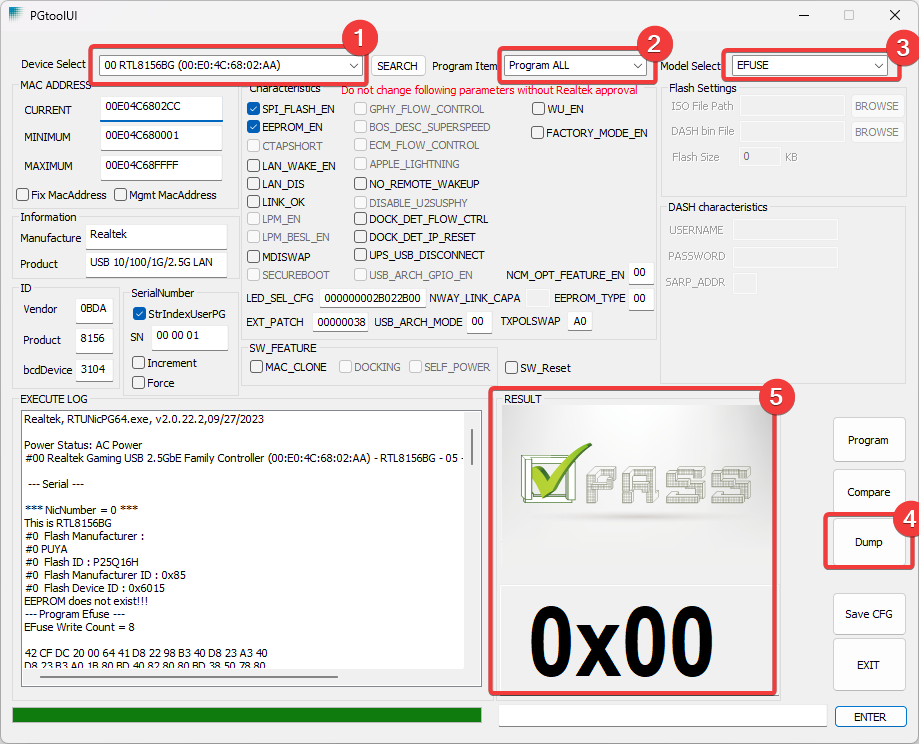
- Set “CURRENT MAC” to your desired value (preserve vendor OUI if possible).
- Click “PROGRAM” to flash; success should show “PASS”.
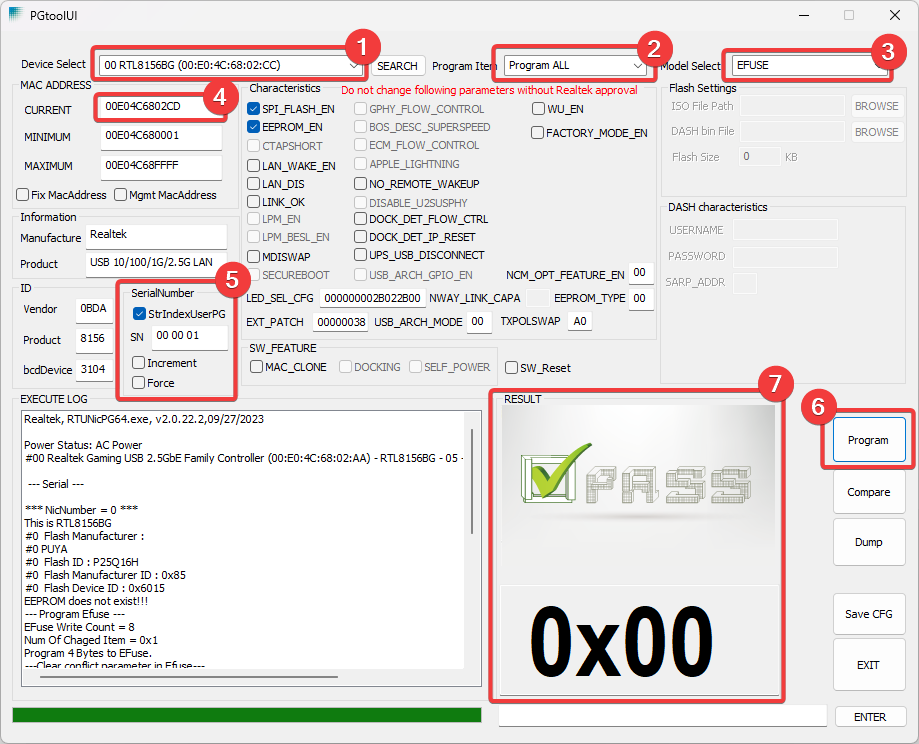
- Done
Serial Number Note:
- The tool allows changing the USB “Serial Number”. Avoid changing it in most scenarios:
- Many Realtek USB NICs share common serial prefixes (e.g., “4013”), so altering it can make your unit uniquely stand out.
- Do not modify other advanced settings unless you know exactly what they do.
- The tool allows changing the USB “Serial Number”. Avoid changing it in most scenarios:
ASIX AX88179(A/B now too!)
- Overview:
- Permanent MAC changes are possible using the ASIX programming utility.
- Keep the vendor OUI (first 6 hex digits) and change only the last 6.
- Downloads:
- ASIXFlash-master.zip
- Upstream reference: ASIXFlash Repository
- Captain Mac Tool.zip
- Password Used:
captaindma- Not added by me, will also open their website...
- Password Used:
- ASIXFlash-master.zip
- Quick Steps:
- Extract the tool, run as Administrator.
- Backup current config/EEPROM if the tool provides an option.
- Program a new MAC that preserves the original OUI.
- Unplug/replug the adapter.
- Done
- Notes:
- AX88179 “A/B” revisions can only be flashed with the Captain Mac Tool.
- If programming fails or reverts, the unit/firmware may be locked or unsupported.
Mellanox ConnectX-3 (CX311A / MCX311A-XCAT)
Verified working procedure - tested on Windows 10 with a real CX311A single-port SFP+ card. The MAC change here is device-level and persistent (burned into NIC firmware), not an OS-level override. Unlike Intel X550 which has one-time-lock behavior, ConnectX-3 supports repeated MAC changes.
Hardware Details
| Detail | Value |
|---|---|
| Card Model | CX311A / MCX311A-XCAT |
| Ports | Single SFP+ |
| PCIe | x4 |
| PSID | MT_1170110023 |
| Firmware | 2.33.5220 |
| Image Type | FS2 |
| Device ID | 4099 |
- RJ45 connectivity was provided through an SFP+ to RJ45 transceiver module.
- Tested transceiver: Tecowin SFP-10G-T-ME (Mellanox compatible)
- Any 10GBase-T SFP+ module with Mellanox compatibility should work.
- Internet and 10 Gbps link were already working before any flashing.
- Link stayed working at 10 Gbps after the MAC change.
- Sourcing: Search for
Mellanox ConnectX-3 CX311A MCX311A-XCAT PCIe x4 SFP+on eBay or AliExpress. These cards are widely available used.
Prerequisites
- OS: Windows 10 / Windows 11 (the tested procedure below was on Windows 10, but the WinOF 5.50 driver and WinMFT 4.13 package are also known to work on Windows 11)
- Driver: WinOF 5.50.53000 - not WinOF-2 (ConnectX-3 is on the older WinOF branch)
- Firmware Tools: WinMFT 4.13.3
Download both installers:
- MLNX_VPI_WinOF-5_50_53000_All_Win2019_x64.zip - WinOF driver package
- WinMFT_x64_4_13_3_6.zip - firmware tools (flint, mst, etc.)
Note: The WinOF installer filename says "Win2019" - this refers to the build target (Windows Server 2019), but the driver installs and works correctly on Windows 10 and Windows 11 desktop as well.
Important: ConnectX-3 / ConnectX-3 EN requires WinOF (not WinOF-2). WinOF-2 is for ConnectX-4 and newer. Using the wrong driver package will fail silently or cause detection issues.
Installation
Install the WinOF driver package first:
- Run
MLNX_VPI_WinOF-5_50_53000_All_Win2019_x64.exe - Follow the installer prompts, reboot if asked
- Run
Install WinMFT:
- Run
WinMFT_x64_4_13_3_6.exe - Default install path:
C:\Program Files\Mellanox\WinMFT
- Run
After installation, the WinMFT folder contains:
mst.exeflint.batflint_ext.exemlxfwmanager.exemlxburn.exemlxconfig.exe- Various DLLs and support files
Important:
mstflint.exedoes not exist as a standalone binary in this Windows install. Useflint.bat(which callsflint_ext.exe) for all flint commands. If you see guides referencingmstflint, substitute.\flint.batinstead.
Step 1: Discover the Device
Open PowerShell as Administrator:
cd “C:\Program Files\Mellanox\WinMFT”
.\mst.exe status -v
Expected output:
MST devices:
------------
  mt4099_pci_cr0         bus:dev.fn=0a:00.0
  mt4099_pciconf0        bus:dev.fn=0a:00.0
Use
mt4099_pci_cr0as the device path for all subsequent commands. This is the preferred path that was tested successfully. Do not usepciconf0unless you have a specific reason.
Step 2: Query Current Firmware and MAC
.\flint.bat -d mt4099_pci_cr0 qExpected output:
Image type:            FS2
FW Version:            2.33.5220
FW Release Date:       29.3.2015
Product Version:       02.33.52.20
Rom Info:              type=PXE version=3.4.467
Device ID:             4099
Description:           Node             Port1            Port2            Sys image
GUIDs:                 ffffffffffffffff ffffffffffffffff ffffffffffffffff ffffffffffffffff
MACs:                                       e41d2da1b2c0     e41d2da1b2c1
VSD:
PSID:                  MT_1170110023
Why two MACs on a single-port card? This is normal.
flintuses a base MAC and auto-assigns Port2 as base+1. Port1 is your active real NIC port. Port2 is stored in firmware metadata but not physically used. Do not panic when you see two MAC values on a single-port card.
Step 3: Verify MAC in Windows
Run these commands to confirm the Windows-visible MAC matches Port1 from flint:
getmac /vConnection Name Network Adapter Physical Address Transport Name
=============== =============== =================== ==========================================================
Ethernet Mellanox Connec E4-1D-2D-A1-B2-C0 \Device\Tcpip_{XXXXXXXX-XXXX-XXXX-XXXX-XXXXXXXXXXXX}ipconfig /allEthernet adapter Ethernet:
Description . . . . . . . . . . . : Mellanox ConnectX-3 Ethernet Adapter
Physical Address. . . . . . . . . : E4-1D-2D-A1-B2-C0
DHCP Enabled. . . . . . . . . . . : Yes
IPv4 Address. . . . . . . . . . . : 192.168.1.100(Preferred)Get-NetAdapter | Format-Table Name, InterfaceDescription, MacAddress, Status, LinkSpeedName InterfaceDescription MacAddress Status LinkSpeed
---- -------------------- ---------- ------ ---------
Ethernet Mellanox ConnectX-3 Ethernet Adapter E4-1D-2D-A1-B2-C0 Up 10 GbpsAlways verify that Windows MAC and flint Port1 MAC match before proceeding.
Step 4: Back Up Firmware Image
.\flint.bat -d mt4099_pci_cr0 ri cx311a-backup.binThis reads the full firmware image from flash memory to a local file. Keep this backup safe - it is your recovery path if anything goes wrong.
Make a copy for testing:
Copy-Item .\cx311a-backup.bin .\cx311a-test.binStep 5: Test New MAC on Image File Only (Strongly Recommended)
Before touching real hardware, test the MAC change on the backup image file. This proves the edit logic works without any risk to the card.
Choose a test MAC. For minimal-risk testing, change only the last nibble of the original:
- Original Port1:
E4:1D:2D:A1:B2:C0 - Test Port1:
E4:1D:2D:A1:B2:C2 - Port2 will automatically become:
E4:1D:2D:A1:B2:C3(base+1)
Write the new MAC to the image file:
.\flint.bat -i .\cx311a-test.bin -mac 0xE41D2DA1B2C2 sgExpected output:
    You are about to change the Guids/Macs/Uids on the image:

                        New Values              Current Values
        Node  GUID:     ffffffffffffffff        ffffffffffffffff
        Port1 GUID:     ffffffffffffffff        ffffffffffffffff
        Port2 GUID:     ffffffffffffffff        ffffffffffffffff
        Sys.Image GUID: ffffffffffffffff        ffffffffffffffff
        Port1 MAC:          e41d2da1b2c2            e41d2da1b2c0
        Port2 MAC:          e41d2da1b2c3            e41d2da1b2c1

 Do you want to continue ? (y/n) [n] : y
Restoring signature                     - OK
Verify the modified image:
.\flint.bat -i .\cx311a-test.bin qImage type: FS2
FW Version: 2.33.5220
FW Release Date: 29.3.2015
Product Version: 02.33.52.20
Rom Info: type=PXE version=3.4.467
Device ID: 4099
Description: Node Port1 Port2 Sys image
GUIDs: ffffffffffffffff ffffffffffffffff ffffffffffffffff ffffffffffffffff
MACs: e41d2da1b2c2 e41d2da1b2c3
VSD:
PSID: MT_1170110023The image file now shows the new MAC values. This confirms the edit logic is correct before touching real hardware.
Step 6: Flash the New MAC to the Real Card
.\flint.bat -d mt4099_pci_cr0 -mac 0xE41D2DA1B2C2 sgExpected output:
-W- GUIDs are already set, re-burning image with the new GUIDs ...
    You are about to change the Guids/Macs/Uids on the device:

                        New Values              Current Values
        Node  GUID:     ffffffffffffffff        ffffffffffffffff
        Port1 GUID:     ffffffffffffffff        ffffffffffffffff
        Port2 GUID:     ffffffffffffffff        ffffffffffffffff
        Sys.Image GUID: ffffffffffffffff        ffffffffffffffff
        Port1 MAC:          e41d2da1b2c2            e41d2da1b2c0
        Port2 MAC:          e41d2da1b2c3            e41d2da1b2c1

 Do you want to continue ? (y/n) [n] : y
Burning FS2 FW image without signatures - OK
Restoring signature                     - OK
The message “re-burning image with the new GUIDs” is normal - it means GUIDs were already set and are being preserved. Success indicators:
Burning FS2 FW image without signatures - OKandRestoring signature - OK.
Step 7: Reboot
shutdown /r /t 0Step 8: Verify After Reboot
Open PowerShell as Administrator again:
cd “C:\Program Files\Mellanox\WinMFT”
.\flint.bat -d mt4099_pci_cr0 q
Image type: FS2
FW Version: 2.33.5220
FW Release Date: 29.3.2015
Product Version: 02.33.52.20
Rom Info: type=PXE version=3.4.467
Device ID: 4099
Description: Node Port1 Port2 Sys image
GUIDs: ffffffffffffffff ffffffffffffffff ffffffffffffffff ffffffffffffffff
MACs: e41d2da1b2c2 e41d2da1b2c3
VSD:
PSID: MT_1170110023getmac /vConnection Name Network Adapter Physical Address Transport Name
=============== =============== =================== ==========================================================
Ethernet Mellanox Connec E4-1D-2D-A1-B2-C2 \Device\Tcpip_{XXXXXXXX-XXXX-XXXX-XXXX-XXXXXXXXXXXX}ipconfig /allEthernet adapter Ethernet:
Description . . . . . . . . . . . : Mellanox ConnectX-3 Ethernet Adapter
Physical Address. . . . . . . . . : E4-1D-2D-A1-B2-C2
DHCP Enabled. . . . . . . . . . . : Yes
IPv4 Address. . . . . . . . . . . : 192.168.1.100(Preferred)Get-NetAdapter | Format-Table Name, InterfaceDescription, MacAddress, Status, LinkSpeedName InterfaceDescription MacAddress Status LinkSpeed
---- -------------------- ---------- ------ ---------
Ethernet Mellanox ConnectX-3 Ethernet Adapter E4-1D-2D-A1-B2-C2 Up 10 GbpsConfirmed results:
- The MAC change succeeded permanently on the NIC firmware.
- Windows picked up the new flashed MAC automatically - no driver or OS-level configuration needed.
- The link remained up at 10 Gbps after the flash.
- Repeated permanent MAC rewriting works on this ConnectX-3 setup.
Choosing a Final MAC Address
The initial test above changed only one nibble as a minimal-risk proof of function. For a long-term MAC, it is cleaner to use a locally administered MAC starting with 02 instead of staying in the original Mellanox vendor range:
| MAC | |
|---|---|
| Example final MAC (Port1) | 02:11:22:33:44:55 |
| Port2 (auto-derived) | 02:11:22:33:44:56 |
.\flint.bat -d mt4099_pci_cr0 -mac 0x021122334455 sgUsing a
02:xx:xx:xx:xx:xxprefix marks the address as locally administered per IEEE standards, avoiding collisions with real vendor OUIs.
Why
02:xxinstead of keeping the vendor OUI? For USB NICs the general best practice is to preserve the original vendor OUI (first 3 bytes) and only change the last 3 - this avoids standing out as an unusual device in network logs. For a firmware-level flash like this, the situation is different: you are rewriting the actual base MAC in NIC firmware, not applying an OS-level override. Using a locally administered02:xxprefix is the IEEE-correct way to assign a self-chosen address and avoids accidentally duplicating a real Mellanox-assigned MAC that exists on another card somewhere. Both approaches work technically - choose based on your threat model.
Quick Reference: Changing MAC Again Later
cd “C:\Program Files\Mellanox\WinMFT”
.\flint.bat -d mt4099_pci_cr0 -mac 0xNEWMAC sg
shutdown /r /t 0
Verify after reboot:
cd “C:\Program Files\Mellanox\WinMFT”
.\flint.bat -d mt4099_pci_cr0 q
getmac /v
Replace 0xNEWMAC with your desired MAC in hex format (e.g., 0x021122334455). Port2 is always derived automatically as base+1.
Troubleshooting
mstflintis “not recognized”- On this Windows install, the relevant executables are
mst.exe,flint.bat, andflint_ext.exe- notmstflint.exe. Use.\flint.batfor all flint operations.
- On this Windows install, the relevant executables are
mst status -vshows nothing- Check that WinOF driver is installed correctly
- Reboot the system
- Reinstall WinOF, then reinstall WinMFT
- Make sure you are running PowerShell as Administrator
Card works in Windows but flint commands fail
- Use
mt4099_pci_cr0as the device path, notpciconf0, unless you have a specific reason
- Use
Do NOT use the following:
bb(burn block) commands-ocrflag- Random firmware image files from the internet
- Crossflashing procedures
- Low-level erase/write steps
Do NOT update firmware first if the card is already working and your goal is MAC changing. Adding a firmware update step introduces unnecessary risk for no benefit in this workflow.
Always test on an image file first (Step 5) before writing to the real device.
Workflow Summary
| Step | Command | Purpose |
|---|---|---|
| 1 | .\mst.exe status -v | Discover device path |
| 2 | .\flint.bat -d mt4099_pci_cr0 q | Query current MAC and firmware |
| 3 | getmac /v | Verify Windows MAC matches |
| 4 | .\flint.bat -d mt4099_pci_cr0 ri cx311a-backup.bin | Back up firmware image |
| 5 | .\flint.bat -i .\cx311a-test.bin -mac 0xNEWMAC sg | Test MAC on image file |
| 6 | .\flint.bat -d mt4099_pci_cr0 -mac 0xNEWMAC sg | Flash MAC to real card |
| 7 | shutdown /r /t 0 | Reboot |
| 8 | .\flint.bat -d mt4099_pci_cr0 q + getmac /v | Verify change persisted |
Restoring Original Firmware from Backup
If you need to restore the original firmware image (including the original MAC), use the backup file from Step 4:
cd "C:\Program Files\Mellanox\WinMFT"
.\flint.bat -d mt4099_pci_cr0 -i cx311a-backup.bin b
Then reboot:
shutdown /r /t 0This writes the full original firmware image back to the card. The
bflag means "burn" - it flashes the entire image from the file to the device. After reboot, the card will have its original MAC and firmware state restored.